
How to File GSTR 6 Using Offline Utility in 2025?


Bio
Ankit Rahangdale is a seasoned finance professional with a distinguished background as a Chartered Accountant. Currently, he leads the Finance Department at Pice. With over five years of invaluable experience in the banking and finance sector, honing his expertise through esteemed institutions such as ICICI Bank and Standard Chartered Bank.
- 1 Aug 25
- 12 mins


Share


How to File GSTR 6 Using Offline Utility in 2025?
- 08 Mins
- 01-08-25


Key Takeaways
- The GSTR-6 offline utility allows Input Service Distributors (ISDs) to prepare and validate returns offline before uploading to the GST portal.
- The tool includes multiple worksheets for ITC received, debit/credit notes, and distribution details, each requiring separate validation.
- A validated JSON file must be generated and uploaded to the GST portal, where multiple uploads are allowed until final submission.
- Error JSON files can be downloaded, corrected within the utility, and re-uploaded for a successful filing.
- Previewing and generating the final GSTR-6 summary on the GST portal ensures accuracy before submission using DSC or EVC.
Input Service Distributors (ISDs) need to file GSTR-6 monthly return. This helps them furnish input service details of distribution and ISD credit follwed by invoices for tax compliance on applicable returns.
Knowing how to file GSTR-6 using an offline utility can help you experience a smooth and hassle-free process while filing the same. Learn the process here to avoid errors and mistakes.
Steps to File GSTR-6 Using an Offline Utility
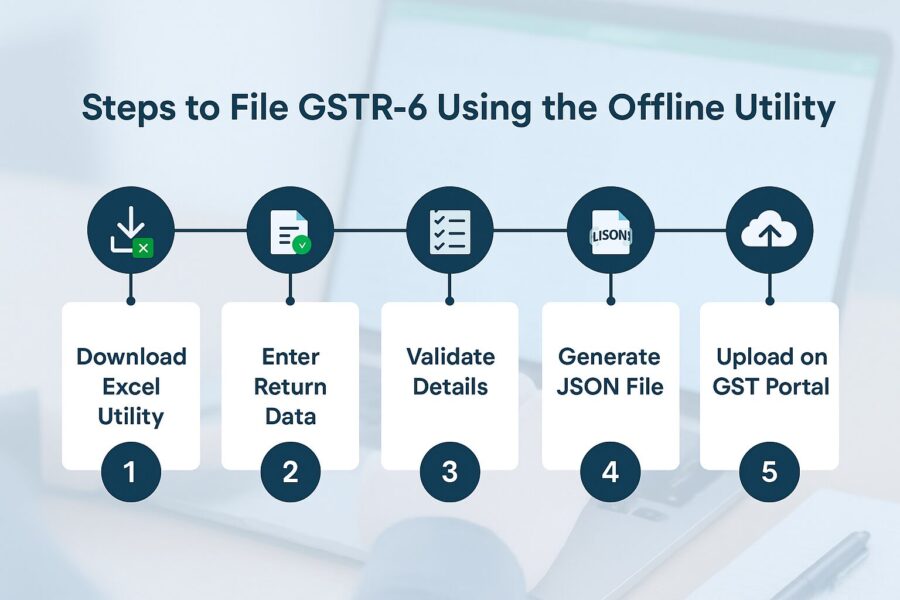
The stepwise process of filing GSTR-6 using the offline utility is divided into 8 stages, from downloading the GSTR-6 Offline Tool to previewing the return on the GST Portal. Let us walk through each stage in detail:
Stage 1: Process to Download and Open the Offline GSTR-6 Tool
To proceed with the filing procedure, you need to first download and open the offline tool. Here's how to do so:
Step 1: Navigate to the online portal on GST Home and click on the search button.
Step 2: Go to the ‘Downloads’ section, then ‘Offline Tool’ and ‘GSTR-6 Offline Tool’. Notably, you do not need to choose the online button.
Step 3: You will find the complete Form GSTR-6 details of offline tool in the 'Downloads Folder'. It takes around 2-3 minutes to download, depending on the speed of your internet connection. Connection to internet and internet speed are crucial factors in the download process.
Ensure you check that the file is not corrupted before you unzip it. To check the same, you can match the values in the file with the values provided under downloads of GSTR-6. An exact match indicates the file is not corrupted.
In order to get the values in your downloaded file, follow the outlined steps:
- Open Windows PowerShell via the Start menu search.
- In PowerShell, enter the command, Get-FileHash <> Algorithm <>.
- Match the hash value shown with the one on the GSTR-6 download page.
- Extract the zip file in case the hash value matches.
Stage 2: Process to Install the GSTR-6 Offline Tool
The following are the steps you need to follow in order to install the GSTR-6 Offline Tool:
Step 4: Once the GSTR-6 Offline Tool is downloaded, extract the contents of the zip folder on your system by clicking on the extract button.
Step 5: Open the file named GSTR-6_WithAmendment_20180925_v3.4.
Step 6: Double-click the file.
Step 7: Click on 'Enable Editing' (the Edit button will help you make changes)
Step 8: Click on 'Enable Content' to proceed.
Stage 3: Prepare GSTR6 Return Through Offline Tool
Here's how you can prepare the GSTR-6 Return using the offline tool:
Step 9: Open the GSTR-6 Excel-based Offline Utility. A pop-up will appear asking if you want to load the saved version.
Click 'No' to open a blank form. Or else, click 'Yes' to restore data from your last session. To start fresh and discard previous changes, also click 'Yes'.
Stage 4: Process to Add Table-wise Details in the Worksheet
Here are the different worksheets in GSTR-6 Offline Utility Tool for modification:
- Read Me: As a taxpayer, you can fill in the worksheets pertaining to details in utility following the introduction and instructions in this section.
- Home: You need to incorporate details like GSTIN and choose tax period and financial year from the drop-down list in this option. Ensure you navigate to the financial year drop-down list followed by return filing period drop-down list. It further includes options like ‘Generate JSON File to upload’, ‘Open Downloaded Error JSON File’, ‘Get Summary’, and ‘Open Downloaded GSTR-6 JSON File’.
- 3 - B2B: This worksheet includes details of inward supplies from a registered dealer. Notably, a taxpayer cannot edit the ‘Status of GSTR’ and ‘Invoice Status’.
- 6B - CDN: This section includes details of debit and credit notes received from supplier of services or goods. Notably, no taxpayer can amend the 'Status of GSTR' and 'Debit/ Credit Note Status'.
- 6A - ITC Received (B2BA): This worksheet includes details pertaining to the amendment of inward supplies from registered dealers.
- 6C - CDNA: This section contains amended debit/credit note details. A taxpayer can amend these details, if necessary.
- 5, 8- Distribution of ITC: The ITC (Input Tax Credit) distribution details in invoices and credit notes are included in this section.
- 9 - Amendment of Distribution of ITC: This section includes amended details of ITC distribution which taxpayers can amend if required.
Notably, under the ‘Action’ column, you can add or delete details as applicable. If you delete any detail, it will not be available in the validated sheet. If you choose 'Add', the GST Portal will treat that row as a new entry and add it to the database. If the details already exist from the previous upload, they’ll be updated with the latest data. Ensure you check the database after upload, and amendments after subsequent uploads. Checking the data at the time of upload helps prevent erroneous entries and duplicate entries. Check the decimal values accurately to avoid errors in Excel utility.
Step 10: After entering all details in the worksheet, click on the Validate Sheet button to check for errors. Note: You must validate each sheet individually for business validations as each sheet includes limited validations
- In Case of Successful Validation: If your validation is successful, a pop-up message will appear and your screen will display 'No Errors Found'. As a taxpayer, you can proceed to click 'Ok' to generate a JSON file.
- In Case of Unsuccessful Validation: If your validation is unsuccessful, the screen will pop up with an error message or fields with errors, 'Sheet Validation Errors'. Identify and correct the highlighted red cells based on the help text. To view error comments, go to the Review tab and click 'Show All Comments'.You need to rectify the issues and click 'Ok' to proceed. Once you have rectified all the issues, you need to click on 'Validate Sheet' before you go to the home screen displaying a popup message about successful validation. Proceed by clicking 'Ok'.
Stage 5: Process to Generate JSON File for Upload
Here are the steps to generate the JSON file:
Step 11: Once your validation is successful, on the home screen click on ‘Generate JSON File to Upload’.
Step 12: Browse the location to save your JSON file.
Step 13: Your screen will display a confirmation message through a pop-up. Click 'Ok' to complete the process.
Stage 6: Process to Upload Generated JSON File of GSTR-6
You can follow the steps mentioned below to upload the generated JSON file:
Step 14: Go to the official GST portal.
Step 15: Select ‘Services’, then ‘Returns’ and ‘Returns Dashboard’.
Step 16: You will land on the File Returns page. Select the financial year from the drop-down list and the tax period for filing a return.
Step 17: Under the GSTR-6 tab, click on ‘Prepare Offline’ using the offline button.
Step 18: On the ‘Choose File’ option, browse the JSON file ready for upload on the GST portal.
Step 19: You will notice the JSON file being validated. Once validation is complete, the details will be updated in the respective tables.
In case of validation failure, you will be notified on the official unified portal. You can download the error report to check the issues.
Note: You can upload the JSON file multiple times on the GST portal before submission, but each new upload will overwrite the previous data. The tables and preview will show only the latest uploaded details. To access processed records, go to: Returns Dashboard > Financial Year > Return Period > GSTR-6 Prepare Offline > Download.
Stage 7: Process to Download the Error JSON File and Upload the Corrected Generated JSON on the GST Portal

You need to download the error JSON file the following way to check the issues:
Step 20: In case of validation failure after uploading the JSON file on the GST portal, the status will show as ‘Processed with Error’.
Step 21: To download the report, click on ‘Generate Error Report’. Report generation may take some time.
Step 22: Click on the ‘Download Error Report’ link after the report is generated.
Step 23: The error report will be downloaded as a .zip file. Save it to your system for future review. To extract the downloaded JSON file, ensure you unzip it from the zip folder.
Right-click the downloaded .zip file and choose 'Extract All' to begin unzipping. Select your desired folder location and hit 'Extract'. Once extracted, the folder will include the error report in JSON format.
Step 24: Open the GSTR-6 tool and navigate to the home tab. Click on ‘Open Downloaded Error JSON files’ under the section 'Error File Handling' using the files button.
Step 25: On the file dialogue box, navigate to the extracted error folder. Select both the files and click on ‘Open’.
Step 26: You will see a success message on the screen before you click ‘Ok’.
Step 27: Ensure you rectify the errors shown on ‘GST Portal Validation Errors’ in each column.
Step 28: Once you complete rectifications, click on ‘Validate Sheet' before you click ‘Get Summary’ after successful validation.
Step 29: Click ‘Generate JSON File to upload’ to create the JSON (.json) file for uploading the offline-prepared GSTR-6 return details to the GST Portal.
Stage 8: Preview Form GSTR-6 on the GST Portal
To preview Form GSTR-6 on the GST Portal, follow these steps:
Step 30: Visit the GST portal. The home page will appear.
Step 31: Log in using your valid credentials.
Step 32: Navigate to Services > Returns > Returns Dashboard. Alternatively, you can click the 'Returns Dashboard' link on the main dashboard.
Step 33: On the 'File Returns' page, select the relevant Financial Year and Return Filing Period (Month) from the drop-down list.
Step 34: Click the 'Search' button.
Step 35: The page will display the return filing due dates via separate tiles. Locate the GSTR-6 tile and click 'PREPARE ONLINE'.
Step 36: Scroll to the bottom of the 'Form GSTR-6 – Return for Input Service Distributor' page and select 'GENERATE GSTR-6 SUMMARY'.
Step 37: A confirmation message will appear at the top. You can check the status after some time.
Step 38: After entering all required details, click the PREVIEW button.
The form’s PDF will download automatically.
Must reads
Conclusion
To answer how to file GSTR-6 using an offline utility, it needs to be mentioned that you should follow the steps mentioned above in the correct sequence. Following the steps will help you avoid issues and errors wherein you can enjoy a seamless journey.
Ensure you rectify the errors in the JSON file to proceed and file GSTR-6 accurately. If you find an error message, you need to address it and rectify it to complete the filing process.
💡If you want to streamline your invoices and make payments via credit or debit card or UPI, consider using the PICE App. Explore the PICE App today and take your business to new heights.
FAQs
What is the GSTR-6 offline utility tool and who should use it?
The GSTR-6 offline utility is an Excel-based tool provided by the GST portal for Input Service Distributors (ISDs) to prepare their monthly GSTR-6 return offline. It allows them to enter invoice-wise ITC details, amendments, and ITC distribution efficiently. This tool is particularly useful when handling bulk data or working with limited internet connectivity. After validation, users can generate a JSON file and upload it online.
How do I validate data in the GSTR-6 offline utility?
After entering details in the respective worksheets (e.g., B2B, CDN, ITC Distribution), click on the “Validate Sheet” button to check for errors. If validation is successful, you’ll see a "No Errors Found" message. If errors are present, affected cells turn red with comments explaining the issue. You must rectify all errors before generating the JSON file. Each sheet requires separate validation.
What should I do if my JSON file upload fails on the GST portal?
If your uploaded JSON file is marked as “Processed with Errors”, click on “Generate Error Report” from the upload history section. Once downloaded, extract the zipped error file and open it using the ‘Open Downloaded Error JSON File’ option in the offline tool. The tool will highlight issues under ‘GST Portal Validation Errors’, which you can correct before revalidating and re-uploading the updated file.
Can I upload the GSTR-6 JSON file multiple times before final submission?
Yes, the GST portal allows multiple uploads of the JSON file before submission. Each new upload overwrites the previous one, so only the latest validated data is retained. This ensures you can make corrections or updates anytime before final filing. It’s important to review the updated tables after each upload for accuracy, especially if amendments or additions were made.
How do I preview and finalize the GSTR-6 return after uploading?
After uploading a valid JSON file, log in to the GST portal, navigate to Returns Dashboard, and select the relevant tax period. Click on ‘Prepare Online’ under the GSTR-6 section, then click ‘Generate GSTR-6 Summary’. After a few minutes, click on ‘Preview’ to download a draft PDF of the return. Once verified, proceed to file using DSC or EVC for final submission.
Read More About GST


About the author

Key Takeaways Comes with an annual membership fee of ₹499...
 0
0
0


×


Want an answer to all your B2B Payment Problems?
Pay your Vendors and Collect from customers with ease using Pice's Payment Solutions. Get:
-
 Instant Transfer
-
 Lowest Rates
-
 Credit on all transaction